Description of the problem
When building test automation for a single page app (SPA) written with Vuex (Vue.js), how can I reliably simulate user interaction on complex elements using JavaScript?
Modern test frameworks like TestCafe and Cypress (and Microsoft’s Power Automate) run inside the browser’s JavaScript web engine and simulate input with JavaScript. But older tools like Selenium WebDriver (and in my case, plain JavaScript) have trouble simulating user actions on these complex Vuex elements.
Building JavaScript automation on web pages can be as easy as programmatically setting a text field’s value like this:
document.getElementById('vehicle_colour').value = 'BLUE';
Unfortunately, this technique doesn’t work with Vue.js and Vuex SPAs. After reading up on Vuex, Vue web applications hold the form data in a global state store, which is referred to as the v-model. Manually typing a value in a text field on a Vuex web form doesn’t insert what you type into the DOM. It is stored in the v-model instead. This screenshot below shows a value typed into a Vuex form. Notice how the text value (‘ENDERBY’) is not reflected in the DOM:
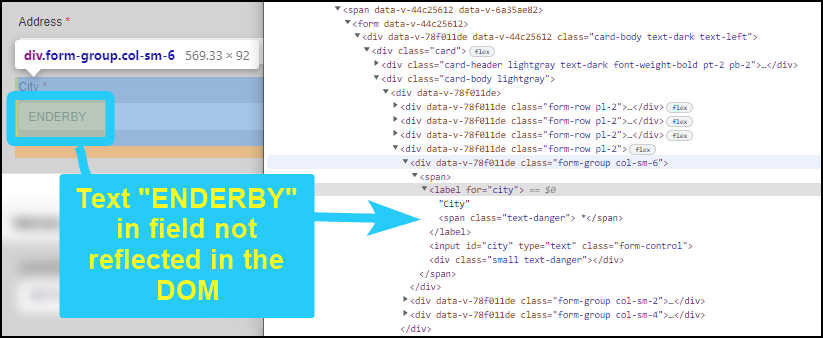
When simulating human input by programmatically setting the value of a text field, the model is not updated. The page looks like the form is filled out, but the information isn’t in the v-model. As far as Vuex is concerned, the field is blank. This can be overcome by setting a text field’s value then evoking an ‘input’ event, like this:
el = document.getElementById('city');
el.value  = "ENDERBY";
el.dispatchEvent(new Event('input'));
So text fields can be filled out with JavaScript on a Vuex form. Other form elements require different events to be triggered. The problem when trying to automate with JavaScript is that a text field is just one of the simplest elements on a Vuex form. Vuex has complex multiple-selection drop-down boxes called multiselects that require a more advanced understanding of JavaScript to automate.
For example, in the screenshot below, you can see a value in the “Vehicle Year” multiselect drop-down, and the selected value (‘1996’) is shown, as a child class element in the DOM:
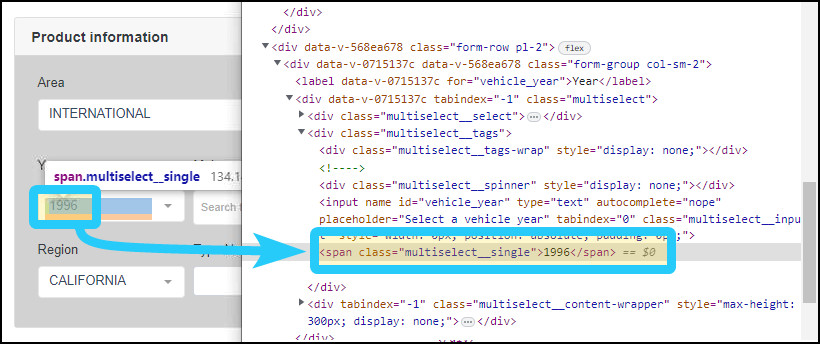
I was able to simulate this in the DOM using JavaScript by programmatically inserting a span in the div and triggering an event, like shown below, but the v-model was not updated.
el = document.getElementById('vehicle_year')
el.value = '1995';
el.insertAdjacentElement("afterend", newSpanElement)
el.parentElement.getElementsByClassName('multiselect__placeholder')[0].remove()
el.dispatchEvent(new Event('input'))
el.dispatchEvent(new Event('change'))  // for luck
I’ve scoured Vue and automation forums looking for examples of how to programmatically update multiselect fields. A lot of the Vuex developer posts are deeply technical and beyond my understanding. The Chromium developer tools don’t expose enough information for me to get a sense of what is going on with the v-model interactions. Or at least, I don’t know enough about the developer tools to know where to look.
How can I reliably and programmatically simulate user interaction with complex Vuex application controls using JavaScript?
More context
-
I installed the Vue.js devtools extension. Unfortunately, because I’m attempting to test an application already deployed to OpenShift, the devtools don’t activate.
-
I asked the developer who built the forms, and he doesn’t know. That’s great for development! Vuex abstracts all the details away so he doesn’t need to know how it works, and we have a beautiful form by building on the work of highly-skilled others. It’s tricky to automate testing though.
-
Automation tools like Microsoft Power Automate, Cypress, and TestCafe are able to interact with the multiselect page objects and reliably simulate user interactions. That is great for end-to-end regression testing, but I want to be able to simulate input with JavaScript, which can supercharge exploratory testing by injecting and triggering JavasScript using an extension like Requestly. Basically, I have used JavaScript to add a hotkey or button on a form to fill out different part of the form fields. For example, click a button to instantly fill out several fields for test scenario 1, another button to fill out fields for scenario 2. This will save product owners, testers and developers huge amounts of time when working with these complex forms.
-
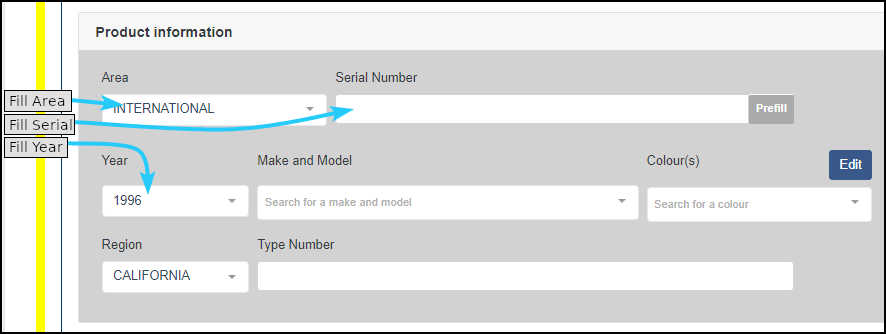
The screenshot below illustrates what I’m trying to do. I added floating buttons on the left side of the page by injecting JavaScript using the Requestly extension. Click “Fill driver 1” and JavaScript fills in all the fields in the “Driver’s Information” section for scenario 1. Click “Fill driver 2” and JavaScript fills in the section for scenario 2. This works great for simple text fields. The rest of the form uses complex multiselect fields that I can’t figure out how to fill out with JavaScript.
-
It seems likely that I could automate the form by directly updating the v-model. However, I would like to simulate user input as closely as possible by triggering controls using JavaScript. This isn’t to replace testing or end-to-end testing, but rather as a convenience when working with the forms during exploratory testing, screen-share demonstrations, and other day-to-day tasks while working on a forms project.
Solution
I arrived at an answer without looking at the Vue.js or Cypress source code, though that was my next step, and doing so may yield a better solution. For now, this works well on complex Vuex elements on the forms I’m working with, and allows individual sections or the entire form to be filled out programmatically with JavaScript, using the browser’s own rendering engine.
How it works
The form is a single-page Vue app, and the Requestly browser extension injects JavaScript onto the page after it loads. There are many ways to inject code onto a page using extensions (eg. TamperMonkey/ViolentMonkey, Autofill) or proxies (eg. Fiddler, or mitmproxy). Requestly seems good because it has a nice interface and can also mock API calls. The code injected by Requestly sits on the local file system (checked out from git, but could be loaded raw from GitHub?) and is currently served by a PowerShell local web server.
This setup is ideal because it allows the automation to be used by a tester, developer, or product owner in a browser while manually working with the form, and also used in an automated system to run end-to-end regression test (eg. Cypress, TestCafe, Power Automate, maybe even Selenium WebDriver). Previously, I was maintaining two separate automations: one for human use, one for end-to-end testing.
The inspiration comes from my observation that modern test frameworks and tools run in the browser engine as JavaScript, rather than simulating user interface events with the WebDriver protocol.
Model, view, controller
There are three JavaScript files injected onto the page when it loads:
- A model: test objects, one object for each scenario. Each object is broken down by form section (e.g. driver section, vehicle section, registration section), with values for each field in a section.
- A view: Buttons and labels overlaid on the page, giving a visual indication that the script has loaded, and allowing different actions to be triggered either with a click or hotkey.
- A controller: code for simulating events for filling out the form.
Automating Vuex element interactions
Different Vuex elements require different approaches. The following examples are simplified, but show how each web form element can be filled programmatically.
Plain text fields
For a basic text field, you set the element value, then trigger an input event. For example:
texfield = document.getElementById(field_id);
texfield.value  = "ABC123";
await texfield.dispatchEvent(new Event('input'));
Radio buttons
Radio buttons don’t need an event triggered. Clicking the button object is enough to make Vuex to update its model. For example:
document.getElementById(field_id).click();
Checkboxes
Checkboxes are toggles and like radio buttons, there is no need need to trigger an event after toggling. You need to check the state beforehand though, and toggle only when needed:
checkbox = document.getElementsById(field_id);
if (checkbox.checked == false)
{
   checkbox.click()
}
Multiselects
These complex elements offer a selection of values from drop-down control, plus type-ahead selection and multiple selections. This was the most complex of the Vuex controls, and where I spent the most time experimenting and reverse-engineering.
el = document.getElementById(field_id);

// Simulate click event on the disclosure control to reveal the values:
await el.dispatchEvent(new Event ('focus'));

pickableElements = el.parentElement.parentElement.parentElement.getElementsByClassName('multiselect__element');

// Iterate through multiselect options looking for the desired value
for (const i in pickableElements)
{
    if (pickableElements[i].innerText == value.toUpperCase())
    {
       pickableElements[i].getElementsByClassName('multiselect__option')[0].click();
       return;
    }
}
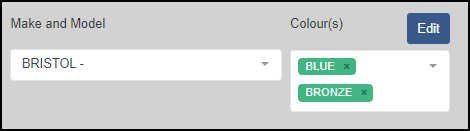
There’s no need to send an update or input event after the click. Here is an example of two different multi-select form elements:
Niceties
The following extras improve maintenance and usability.
Form data The form data is broken up into sections just like the form is, where each section has multiple elements (text boxes, radio buttons, multiselects, checkboxes). The test scenarios are organised into sections where the key is the page element id, and the value is the expected value. For example, in the section drivers_information below, we want the value of object id drivers_number to be set to 1234567:
var scenario1 = {
    drivers_information: {
        drivers_number:  "1234567",
        drivers_licence_jurisdiction: "British Columbia",
        last_name:       "Dogsneeze",
        first_name:      "Davey",
        dob:             "19990909",
        address1:        "77 Seventh St South",
        driver_phone:    "111-000-2222",
        city:            "Boston Bar",
        postal:          "V1V 2V2",
        province:        "British Columbia"
    },
    vehicle_information: {
        plate_number:   "AA057A",
        plate_province:  "ALBERTA",
        plate_year: "2022",
        plate_val_tag: "02",
        registration_number: "REG-12345",
        vehicle_type: "random",
        vehicle_year: "random",
        vehicle_make: "random",
        vehicle_color: "random",
        vin_number: "VIN012345679",
        puj_code: "ALBERTA",
        nsc_number: "NSC1234567890"
    }
}
As the sections are iterated, each object is inspected to determine if it’s a checkbox, radio button, textfield, or multiselect. The value is set by calling a function to fill the appropriate control.
Breaking the fields up by section allows for sections to be filled individually. Multiple test records can be injected onto the page and mix-and-matched as needed.
Basic UI
A very basic set of labels and buttons are overlaid on top of the web page like this:
// Add a label
let lbl = document.createElement("label");
lbl.innerHTML = labelText;

labelStyle = "top:" + topLocation + " !important;left:" + leftLocation + " !important;position:fixed;z-index: " + zIndex;
console.log("Adding label " + labelText + ": " + labelStyle);
lbl.style = labelStyle;
document.body.insertAdjacentElement("afterbegin", lbl);

// Add a button (to trigger autofill)
let btn = document.createElement("button");
btn.innerHTML = buttonName;

buttonStyle = "top:" + topLocation + " !important;left:" + leftLocation + " !important;position:fixed;z-index: " + zIndex;
console.log("Adding button " + buttonName + ": " + buttonStyle);
btn.style = buttonStyle;

btn.addEventListener('click', () => {
    FillFormSection(fieldStructure);
})
document.body.insertAdjacentElement("afterbegin", btn);
The page content is moved over by a 140 pixels to make room for the buttons and labels. The form is responsive, so it doesn’t impact content, but the move has to be done after the page has rendered. To do this, I added an observer to trigger a DOM update after the page finishes rendering:
// Select the entire DOM for observing:
const target = document.querySelector('body');

// Create a new observer instance to update the app container when it appears
const observer = new MutationObserver(function () {
    // Trigger when the 'app' element loads
    if (document.getElementById('app')) {
        document.getElementById('app').style.paddingLeft = "140px"
    }
});

// Set configuration object:
const config = {childList: true};

// Start the observer
observer.observe(target, config);
Hot keys
As a convenience for humans, sections can be filled by pressing Alt+1, Alt+2, et cetera:
// Set up hotkeys to fill form sections (Alt+1 to fill driver information, etc)
document.onkeyup = function () {
    var e = e || window.event; // for IE to cover IEs window event-object
    if (e.altKey && e.which == "1".charCodeAt(0)) {
        FillFormSection(form.drivers_information);
        return false;
    } else if (e.altKey && e.which == "2".charCodeAt(0)) {
        FillFormSection(form.vehicle_information);
        return false;
    }
}
There’s also a hotkey to iterate through all the sections of the form and fill each one, plus another to iterate through the form and erase each entry.
Random and generated records
When a multiselect is used, you can easily pick a value at random. This can be useful to introduce variety to the test records.
At some point I will also introduce randomly-generated field values from Change.js.
I’m not a JavaScript expert or web developer. This solution is probably not the most elegant, but it gets the job done without fuss, and can be iterated upon.